Make sure someone in your group has experience with the following:
Instructions
- Determine what you would like to monitor.
- Goals – If your goal is to monitor changes in ocean acidity due to climate change, try to avoid areas with pollution and human activity.
- Contingency – If you are interested in the impacts of a particular wastewater or pollution source on water quality, it might be difficult to find a suitable place to install a continuous monitoring station. If that is the case, you can take your monitoring station to collect data periodically without installing it permanently. This can even be done using a battery bank and mobile hotspot.
- Design your system.
- WiFi or cell tower (GSM) communication
- Select sensors for acidity, dissolved oxygen, electrical conductivity, oxidation/reduction potential, and/or temperature
- Grid power or solar panel with battery
- Adafruit IO or ThingSpeak data collection and display
- Order parts.
- Find collaborators to support your installation.
- Contact – Get in touch with the managers of the dock, pier, house, beach, etc where you would like to install your station and see if they are interested in supporting ocean science.
- Options – Contact a few different people, this helps to create broader support and awareness, as well as ensure that you find a place where everything can work out.
- Communicate – Explain to your partners what you’re doing and why, and if the space is used by other people, see if you can talk to some of them or hold a small info session so they are aware of the project. This also gives you a chance to introduce your team and share contact info.
- Plan – Work out a schedule for when you can install the system, run a few tests, and visit periodically to check on and maintain the system. We recommend visiting at least weekly to make sure everything is going smoothly and to perform regular maintenance.
- Set up an Adafruit IO or ThingSpeak account.
- Program your board.
- Go to our Github to find the code, add in your credentials
- Download Arduino and install dependencies
- Plug in your board and select the port in Arduino
- Compile and upload the program
- Build the monitoring station.
- Materials – Gather your tools, instructions, electronic components, and other parts you’ll need to put together your station. Here is the basic list, but it might be a bit different depending on your design:
- Tools
- Screwdrivers (iFixit kit if you got it)
- Pliers
- Wire cutters
- Wire strippers
- Drill
- Knife
- Soldering iron
- Solder
- Multimeter
- Laptop or phone
- Parts
- Arduino MKR GSM 1400 microcontroller board
- Sensors (pH, DO, EC, Temp)
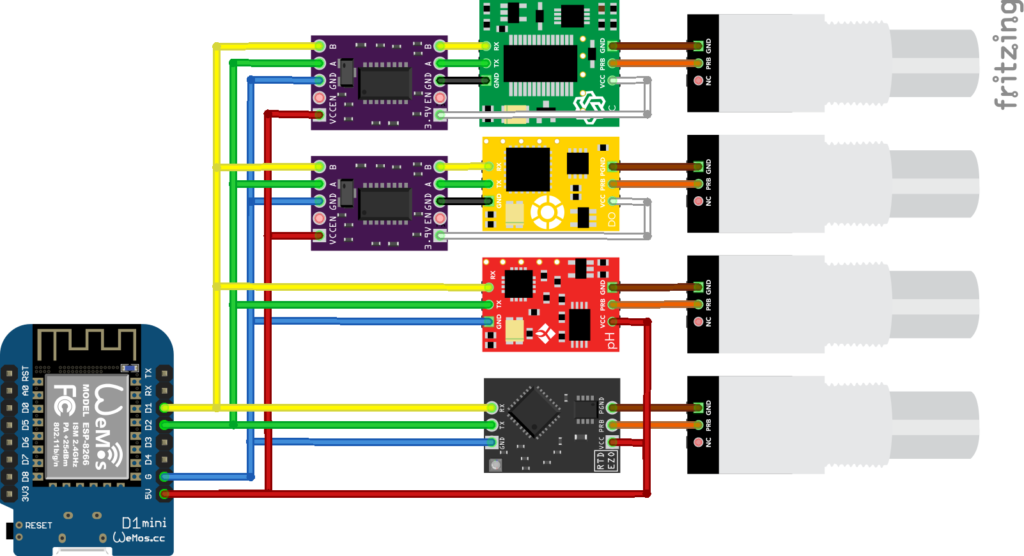
- EZO sensor circuits
- Voltage isolator circuits (for EC and DO when measured with pH)
- When reading pH and Conductivity or Dissolved Oxygen together, it is strongly recommended that the EZO™ pH circuit is electrically isolated from the EZO™ Conductivity or Dissolved Oxygen circuit.
- (https://files.atlas-scientific.com/pH_EZO_Datasheet.pdf page 6)
- (https://files.atlas-scientific.com/DO_EZO_Datasheet.pdf page 6)
- (https://files.atlas-scientific.com/EC_EZO_Datasheet.pdf page 9)
- GSM antenna
- Connectors
- PCB board
- Breadboard (for testing)
- Headers
- Wires
- Power supply
- Solar panel
- Battery
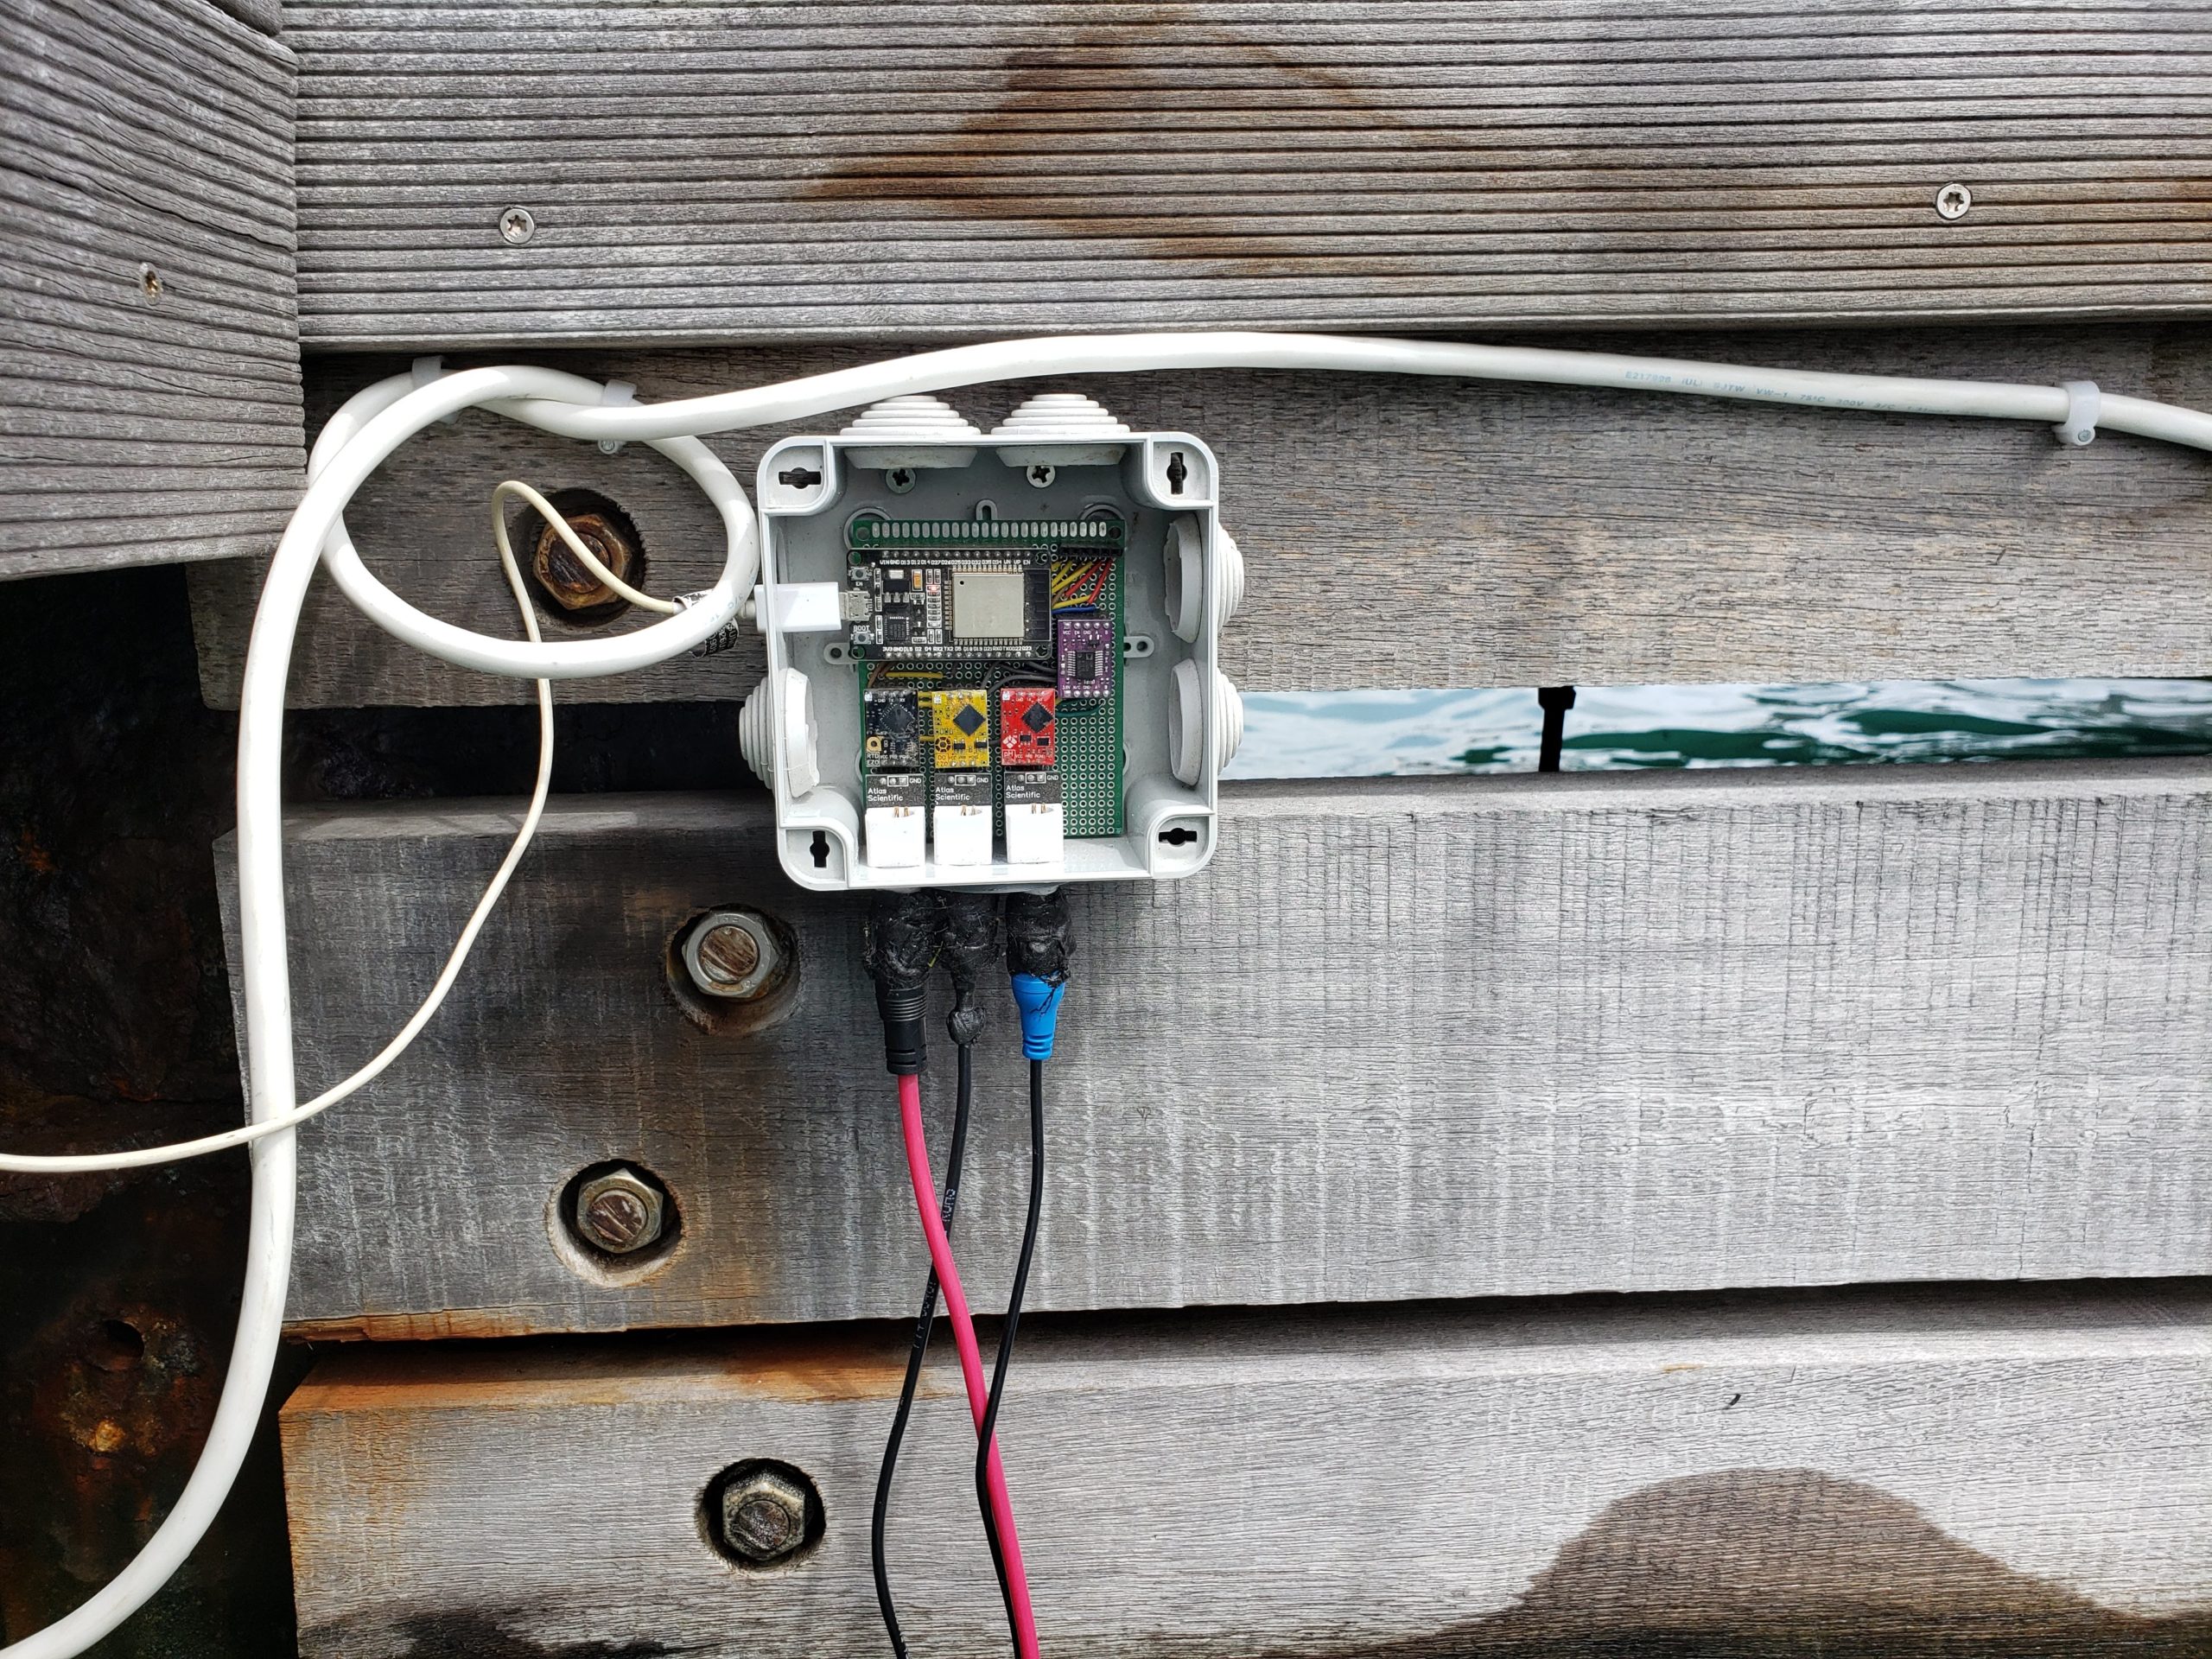
- Enclosure box
- Extension cord
- Tools
- Calibrating – Use the guide from Atlas Scientific to calibrate your sensors. You’ll also need the calibration solution from them. For the pH sensor, this should be repeated every one to two years. For the DO sensor, the electrolyte solution and membrane need to be replaced every 6-12 months. The EC sensor only needs to be calibrated once.
- Testing – Use the wiring diagram to figure out how to wire up your electronics. Initially, it is a good idea to use a breadboard to wire things up temporarily before you solder anything together. Once you have the test circuit wired up, double check everything before you plug in the power. Initially, power it through your laptop USB, and run Arduino so that you can watch the Serial Monitor. It should start by sending a message that it’s connecting, then it should read out the data being collected. Check on your Adafruit IO dashboard to make sure that the data is being uploaded.
- Wiring – Now that everything is working well, start building your PCB according to the wiring diagram. For the main board and the EZO sensor circuits, use headers so that you don’t have to solder the boards directly. This also allows you to easily switch out components if you need to later, if you need to replace, upgrade, or change your configuration.
- Materials – Gather your tools, instructions, electronic components, and other parts you’ll need to put together your station. Here is the basic list, but it might be a bit different depending on your design:
- Enclosure – For your enclosure, you’ll want to keep the electronics as well protected as possible. The components do need to stay cool, you can check the datasheets for temperatures but basically if it’s going to be in direct sunlight in a warm climate you’ll probably want some openings for airflow. At the same time, you want to keep ocean water and rain out, so you can equip it with splash guards or shelter as needed. The wires for power / solar panels and for the sensors will need to go through the side of the enclosure. You can use a bit of soft foam to make a seal around wires going through a hole, or for a strong waterproof seal you can use some silicone caulking. It’s important to add some stress relief to these wires so they don’t pull on the connectors. This can be a simple loop with a zip tie somewhere on the outside of the enclosure.
- Select the best location to install your station.
- Electricity and wifi – If your setup will need wifi or electrical connections, you’ll need to find a place with that infrastructure. For wiring up the electricity, you might need access to the electrical box so that you can hardwire your station without occupying any outlets. For the wifi, you’ll need to get the credentials in advance, and make sure that you stay up to date if they change at any point.
- Solar – If you are using solar power, make sure there is a location to mount the solar panel that will have exposure to sunlight for most of the day.
- GSM – If you’re using a GSM connection, do your best to make sure the antenna can connect to cell towers. Generally it needs to be away from metal, concrete, and wet things.
- Access – Consider how easily you’ll be able to access the station for maintenance or other adjustments that might need to be made. Is there a locked door? Limited opening hours? Is it close by? Can someone on your team get there quickly if they need to?
- Safety – Make sure you install it in a place that isn’t going to endanger anyone, for example don’t put it where it might get caught in a boat propeller, or where someone might trip or hit their head on it. This will also help to make sure the device doesn’t get accidentally damaged so that it can keep collecting data.
- Weather – Think about the impacts of local weather, things like sun, sand, salt, wind, and rain can all damage electronic components or knock things down. Ideally, your electronics will be safe inside a box that doesn’t get direct sun or rain, and is securely attached to a structure. If there is a chance that waves or rain might splash it from above or below, consider adding a splash guard.
- Test, monitor, and maintain.
- Test – Once everything is initially in place, make sure it works well. Stay at the site for as long as you can to monitor data collection and uploads. If anything is wrong, it will likely happen soon and you should be able to observe it in the first few minutes after installation. Identifying the problem might be more challenging, but hopefully everything goes well. If not, double check the wiring and the code. If you have the station on solar power with a battery, test it with another power source. Take a laptop with you to confirm that the station is connecting and that the data is being reported. If it’s not connecting, try repositioning the device. If it makes sense, you can also set up your phone as a hotspot to see if the wifi is the issue.
- Monitor – Closely watch the dashboard to make sure that data is being uploaded and saved. Download the feed data periodically and check how frequently it is being collected, and if the data makes sense. Check the dates and times of the data points, make sure they are being logged at the frequency that you programmed your station for, and that there aren’t any long gaps without data. If there are gaps, it might indicate issues with communication, possibly due to the placement of the station, antenna, or wifi router. If some data come through and some don’t, it might be a wiring issue with one of your sensors.
- Maintain – Take good care of your monitoring station. Visit frequently, and when you can’t make sure that someone else is keeping an eye on it. Things will start to grow on your sensor probes, so make sure to clean them regularly. On an annual basis, you’ll need to recalibrate your pH sensor. You’ll need to replace your electrolyte solution and membrane on your DO sensor every 6-12 months. Your EC sensor shouldn’t need any recalibration or maintenance.