

We’re prototyping affordable open source systems for monitoring air quality. Right now these measure particulate matter, temperature, and humidity.
We designed and assembled a basic air quality monitoring station to start collecting air quality data in Aruba, which was not being done in any public way until now. The idea is to have the design process open, to have the sensor stations cheap and easy to put together, and to share the data openly.
For an introduction into why air quality is important, check out this article from Weather Underground: https://www.wunderground.com/cat6/it%E2%80%99s-time-give-air-quality-attention-it-deserves More helpful links can also be found at the bottom of this page.
Prototypes
You can see the live data from our prototypes on the Adafruit IO website here:
Indoor near the window at our headquarters at Flemingstraat 26: http://io.adafruit.com/brenchies/dashboards/airuba-sividivi
Outdoor at our friend’s house in Sero Blanco, near EPI: https://io.adafruit.com/metabolic/dashboards/airuba-sero-blanco
Just outside our shop in mainstreet Oranjestad: https://io.adafruit.com/brenchies/dashboards/airuba-mainstreet
Our previous version is displayed on this website, with download options: https://science.brenchies.com/aq/air-quality/mainstreet.php
And our visualization prototype is here: https://editor.p5js.org/sevold/sketches/6Cthym-Ym
Working design
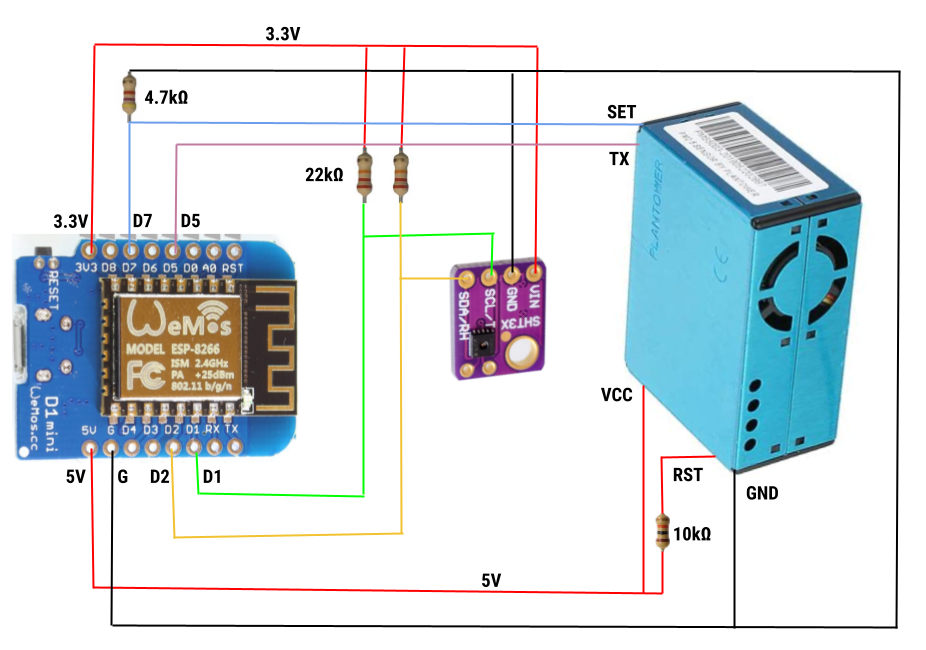
The system we’re using for our initial pilot is based on an ESP8266 D1 mini, a wifi-enabled Arduino board, which is connected to two sensors, a PMS5003 particulate matter sensor, and an SHT31 temperature and humidity sensor. Many air quality parameters are difficult to measure using cheap sensors, but particulate matter can be reliably measured by a few different sensors that are available for under $50 USD. Temperature and humidity data can also be reliably measured using an affordable sensor, so our pilot was limited to these two sensors. Links to descriptions and datasheets for the components we used as well as the schematic for our prototype are below.
Prototype components
- ESP8266 D1 mini microcontroller board
- Plantower PMS5003 laser particle concentration sensor
- Sensirion SHT31 digital humidity and temperature sensor
Wiring and programming
The wiring is pretty straightforward, the PMS5003 sensor operates on a serial connection, with its TX pin connected to the D5 pin on the board (which is set up as a serial receiving pin using a software serial connection). The SHT31 sensor is connected using an I2C protocol so the SCL pin connects to SCL (D1) on the board, and SDA to SDA (D2).
The code is hosted on github, with different versions being posted as we improve things. The link for that is here: https://github.com/brenchies/airuba
For programming the ESP8266 D1 mini, you’ll need to install the ESP8266 boards, and select the LOLIN(WEMOS) D1 R2 & mini from the Tools > Boards menu for programming
You’ll also need to install the Adafruit_SHT31 library using the library manager.
Step by step instructions
- Get the components
- Lolin Wemos D1 mini ESP8266 controller board
- Plantower PMS5003 particulate matter sensor
- Sensirion SHT31 temperature and humidity sensor breakout board
- Resistors
- USB micro 5V power supply
- Wires and breadboard
- Build the circuit
- Download and install Arduino IDE
- Install ESP8266 boards in Arduino
- In Arduino, go to File > Preferences, and copy and paste this into the “Additional Boards Manager URLs” box near the bottom then click OK:
- http://arduino.esp8266.com/stable/package_esp8266com_index.json
- Go to Tools > Board > Boards Manager and search for ESP8266 in the top box, then click “Install”
- Guide is here if you need more details: https://randomnerdtutorials.com/how-to-install-esp8266-board-arduino-ide/
- In Arduino, go to File > Preferences, and copy and paste this into the “Additional Boards Manager URLs” box near the bottom then click OK:
- Get our working code from Github into your Arduino IDE
- Copy (ctrl+A, ctrl+C) the Airuba_aio.ino sketch from here:
- Paste (ctrl+A, ctrl+V) it into a new sketch in Arduino
- Add a new tab to your sketch in Arduino using the little triangle button in the top right, and call it config.h
- Put our example code into it:
- Set up an Adafruit IO account, feeds, and dashboard:
- Add your Adafruit and wifi credentials to your code:
- In the config.h tab…
- Copy and paste your Adafruit IO API key from the Adafruit IO website (click the key icon on the top right and you’ll see it) and paste it over the lines with #define IO_USERNAME and IO_KEY
- Put your wifi network name and password in on the lines with #define WIFI_SSID and WIFI_PASS between quotes
- In the main code…
- Update the names of the feeds you’re using at the top, or leave them as is if you used the same names. The names you define on the Adafruit IO website should match the part on the right in quotes, e.g. if your temperature feed on Adafruit IO is called TempFeed, your declaration line should read AdafruitIO_Feed *temperatureFeed = io.feed(“TempFeed”);
- Do this for each of the three particulate matter sizes as well as temperature and humidity
- In the config.h tab…
Preliminary results
So far we’ve tested stations at a few locations around the island, and had a variety of issues with wifi connections, salty Aruban air, and power cables. We’ve worked on some of these issues and are in the process of setting up reprogrammed stations in a few new locations.
We also had an open workshop to develop a more intuitive interface for this data, which resulted in the following animation (currently not live):
http://caribbeanwebsolutions.com/brenchies/aq
The code for the animation was developed using p5 and can be found at:
Air quality info
https://www.epa.gov/pm-pollution/particulate-matter-pm-basics#PM
https://www.epa.gov/pm-pollution/health-and-environmental-effects-particulate-matter-pm
https://www.who.int/health-topics/air-pollution
https://www.airnow.gov/aqi/aqi-basics/
https://www.airnow.gov/sites/default/files/2020-05/aqi-technical-assistance-document-sept2018.pdf
Sensor links
https://cdn-shop.adafruit.com/product-files/3686/plantower-pms5003-manual_v2-3.pdf
https://learn.adafruit.com/pm25-air-quality-sensor/overview
https://www.atlas-scientific.com/_files/_datasheets/_probe/EZO_CO2_Datasheet.pdf
https://www.atlas-scientific.com/product_pages/probes/ezo-co2.html
https://aqicn.org/sensor/pms5003-7003/
ESP8266 links
https://randomnerdtutorials.com/how-to-install-esp8266-board-arduino-ide/
https://cyaninfinite.com/getting-started-with-the-wemos-d1-esp8266-wifi-board/
https://www.instructables.com/id/Programming-the-WeMos-Using-Arduino-SoftwareIDE/
https://wiki.wemos.cc/products:d1:d1
https://wiki.wemos.cc/_media/products:d1:d1_v2.0.0.pdf
Steps to install and connect to the ESP8266 Wemos D1 board
- File>Preferences>Additional Board Manager URL:http://arduino.esp8266.com/stable/package_esp8266com_index.json
- Tools>Board>Boards Manager search and install esp8266
- Tools>Board>LOLIN(WeMos) D1 R2 & mini
- Tools>Port>COM##
Other relevant links
Internal voltage meter
https://code.google.com/archive/p/tinkerit/wikis/SecretVoltmeter.wiki
https://provideyourown.com/2012/secret-arduino-voltmeter-measure-battery-voltage/
Arduino course material for environmental science
https://docs.google.com/document/d/1hyRTMhZN4TzOi1P1D3fZbgv_KO8QyXcPvAWYt8RaqsM/edit?usp=sharing
Adafruit example setup
https://blog.adafruit.com/2015/05/26/make-an-air-pollution-detector-with-arduino/
Instructable